前言
这段时间我已经在一个公司实习了,虽然工资不高,我并没有太多的介意。但是有一点是我不舒服的,负责我们部门的经理助理似乎看不起实习生,对我有些轻蔑。主要是他技术也不是很牛逼那种。整个公司用的技术还是比较落后那种。当我推荐Vue时竟然说这种别人封装好的js不太好。当时内心有一千条草泥马奔跑,那你为什么还要用jQuery?so,我打算跳槽,跳去更有发展的公司,毕竟我现在是实习,主要还是希望得到成长~于是接到了一个安卓面试,所以特地前来写下这篇文章进行复习。(本人面试现在的公司就是来做安卓的,但是人手不够让我做做前端)
正文
安卓现在比较热火的四大框架应该是Rxjava,retrofit,Okhttp,Dagger。于是我去翻各种博文自己尝试着去写一个小demo。首先来看看我们这个小demo的一个效果图:
可以看到我们这个demo就是调用了一个接口,有一个滑动列表,有图片,有的是视频,点进去可以观看视频。一个很简单的App DEMO。好了废话不多说,让我们开始吧!
第一,先来看看我们整个项目引入的依赖:
1
2
3
4
5
6
7
8
9
10
11
12
13
14
15
| implementation fileTree(dir: 'libs', include: ['*.jar'])
implementation 'com.android.support:appcompat-v7:27.1.0'
implementation 'com.android.support:recyclerview-v7:27.1.0'
implementation 'com.android.support:cardview-v7:27.1.0'
implementation 'com.android.support.constraint:constraint-layout:1.0.2'
testImplementation 'junit:junit:4.12'
androidTestImplementation 'com.android.support.test:runner:1.0.1'
androidTestImplementation 'com.android.support.test.espresso:espresso-core:3.0.1'
//最主要的是下面这几条
implementation "io.reactivex.rxjava2:rxjava:2.1.10"
implementation 'io.reactivex.rxjava2:rxandroid:2.0.2'
implementation 'com.squareup.retrofit2:retrofit:2.4.0'
implementation 'com.squareup.retrofit2:converter-gson:2.3.0'
implementation 'com.squareup.retrofit2:adapter-rxjava2:2.3.0'
implementation 'com.github.bumptech.glide:glide:4.6.1'
|
其次来看看我们整个项目的一个结构图(MVP架构,直接用MVPHelper生成的):
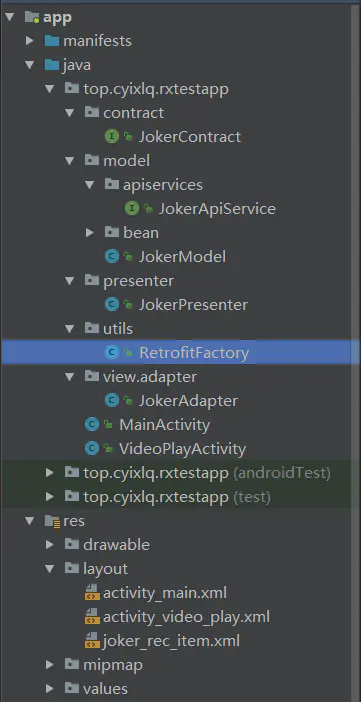
现在来介绍一下整个项目结构:
- contract包里面放的是接口,用来约束后面的开发;
- model里面就是实体类对象和提供后台数据的请求接口;
- presenter,很明显就是MVP中的P,主持者类;
- view里面本来我是要把activity也放进去的,但是没放,里面就放了一个RecyclerView的适配器。
- utils里面是一个创建Retrofit的工厂类
至此,整个包的项目结构就算是介绍完成了。
第二,在主界面布局文件中加入一个RcyclerView和一个ProgressBar,根布局我们直接使用的是ConstraintLayout:
1
2
3
4
5
6
7
8
9
10
11
12
13
14
15
16
17
18
19
20
21
22
23
24
25
26
27
| <android.support.constraint.ConstraintLayout xmlns:android="http://schemas.android.com/apk/res/android"
xmlns:app="http://schemas.android.com/apk/res-auto"
xmlns:tools="http://schemas.android.com/tools"
android:layout_width="match_parent"
android:layout_height="match_parent"
tools:context="top.cyixlq.rxtestapp.MainActivity">
<ProgressBar
android:id="@+id/pro"
android:layout_width="wrap_content"
android:layout_height="wrap_content"
android:visibility="gone"
app:layout_constraintBottom_toBottomOf="parent"
app:layout_constraintEnd_toEndOf="parent"
app:layout_constraintStart_toStartOf="parent"
app:layout_constraintTop_toTopOf="parent" />
<android.support.v7.widget.RecyclerView
android:id="@+id/rec"
android:layout_width="0dp"
android:layout_height="0dp"
app:layout_constraintBottom_toBottomOf="parent"
app:layout_constraintEnd_toEndOf="parent"
app:layout_constraintStart_toStartOf="parent"
app:layout_constraintTop_toTopOf="parent" />
</android.support.constraint.ConstraintLayout>
|
接着就是创建一个RecyclerView的单个条目布局文件joker_rec_item.xml,根布局我们用的是CardView:
1
2
3
4
5
6
7
8
9
10
11
12
13
14
15
16
17
18
19
20
21
22
23
24
25
26
27
28
29
30
31
| <android.support.v7.widget.CardView xmlns:android="http://schemas.android.com/apk/res/android"
android:layout_width="match_parent"
android:layout_height="wrap_content"
xmlns:app="http://schemas.android.com/apk/res-auto"
app:cardCornerRadius="5dp"
app:cardElevation="3dp"
app:contentPadding="5dp"
android:layout_marginBottom="5dp">
<TextView
android:id="@+id/title"
android:layout_width="wrap_content"
android:layout_height="wrap_content"
android:text="标题"
android:textSize="15sp"/>
<TextView
android:id="@+id/content"
android:layout_width="wrap_content"
android:layout_height="wrap_content"
android:textSize="10sp"
android:layout_marginTop="20dp"
android:text="内容"/>
<ImageView
android:id="@+id/img"
android:layout_width="match_parent"
android:layout_height="wrap_content"
android:layout_marginTop="40dp"/>
</android.support.v7.widget.CardView>
|
可以看出这个布局很简单,就是标题内容都是TextView,还有一个ImageView来展示图片。
然后把约束类建立起来,JokerContract:
1
2
3
4
5
6
7
8
9
10
11
12
13
14
15
| public interface JokerContract {
interface Model {
void getJokerList(String type,String page,Observer<Joker> observer);
}
interface View {
void showJokerList(List<Joker.DataBean> list);
void getJokerListFinish();
void getJokerListErro(String msg);
}
interface Presenter {
void getJokerList(String type,String page);
}
}
|
第三,完成我们的Retrofit的工厂类RetrofitFactory:
1
2
3
4
5
6
7
8
9
10
11
12
13
14
15
16
17
| public class RetrofitFactory {
private final static String BASE_URL="https://www.apiopen.top/";
private static final long TIMEOUT = 30;
private static JokerApiService jokerApiService=new Retrofit.Builder()
.baseUrl(BASE_URL)
//添加Gson转换器
.addConverterFactory(GsonConverterFactory.create())
//// 添加Retrofit到RxJava的转换器
.addCallAdapterFactory(RxJava2CallAdapterFactory.create())
.build()
.create(JokerApiService.class);
public static JokerApiService getJokerApiService(){
return jokerApiService;
}
}
|
第四,完成M层,先完成接口api的请求,在model包中的apiservices包中新建一个接口,JokerApiService:
1
2
3
4
| public interface JokerApiService {
@GET("satinApi")
Observable<Joker> getJokerList(@Query("type")String type,@Query("page")String page);
}
|
然后利用GsonFormat创建实体类Joker(内容有点长,但是其实我们会用到的属性不多):
1
2
3
4
5
6
7
8
9
10
11
12
13
14
15
16
17
18
19
20
21
22
23
24
25
26
27
28
29
30
31
32
33
34
35
36
37
38
39
40
41
42
43
44
45
46
47
48
49
50
51
52
53
| public class Joker {
private int code;
private String msg;
private List<DataBean> data;
//get和set省略
public static class DataBean {
private String type;
private String text;
private String user_id;
private String name;
private String screen_name;
private String profile_image;
private String created_at;
private Object create_time;
private String passtime;
private String love;
private String hate;
private String comment;
private String repost;
private String bookmark;
private String bimageuri;
private Object voiceuri;
private Object voicetime;
private Object voicelength;
private String status;
private String theme_id;
private String theme_name;
private String theme_type;
private String videouri;
private int videotime;
private String original_pid;
private int cache_version;
private String playcount;
private String playfcount;
private String cai;
private Object weixin_url;
private String image1;
private String image2;
private boolean is_gif;
private String image0;
private String image_small;
private String cdn_img;
private String width;
private String height;
private String tag;
private int t;
private String ding;
private String favourite;
private Object top_cmt;
private Object themes;
//get和set省略
}
}
|
接着就是把Model类建起来,JokerModel:
1
2
3
4
5
6
7
8
9
| public class JokerModel implements JokerContract.Model {
@Override
public void getJokerList(String type, String page, Observer<Joker> observer) {
JokerApiService apiService=RetrofitFactory.getJokerApiService(); //获取接口
Observable<Joker> observable= apiService.getJokerList(type,page); //利用接口获取数据
observable.subscribeOn(Schedulers.io()).observeOn(AndroidSchedulers.mainThread())
.subscribe(observer); //在IO线程执行,发送结果到主线程
}
}
|
这样,M层算是完成了。
第五,完成P层,新建JokerPresenter:
1
2
3
4
5
6
7
8
9
10
11
12
13
14
15
16
17
18
19
20
21
22
23
24
25
26
27
28
29
30
31
32
33
34
35
36
37
| public class JokerPresenter implements JokerContract.Presenter {
JokerContract.Model mModel;
JokerContract.View mView;
public JokerPresenter(JokerContract.View view){
mModel=new JokerModel();
this.mView=view;
}
@Override
public void getJokerList(String type, String page) {
mModel.getJokerList(type,page,new Observer<Joker>(){
@Override
public void onSubscribe(Disposable d) {
}
@Override
public void onNext(Joker joker) {
List<Joker.DataBean> list=joker.getData();
mView.showJokerList(list); //视图层将列表结果展示出来
}
@Override
public void onError(Throwable e) {
mView.getJokerListErro(e.getMessage()); //视图层将错误信息显示出来
}
@Override
public void onComplete() {
mView.getJokerListFinish(); //视图层完成数据获取状态
}
});
}
}
|
至此,P层算是完成了。
第六,完成V层,也就是视图层,在第一步中我们已经把各种布局写完了,这里我们主要写activity和RecyclerView的适配器。先来写适配器,JokerAdapter:
1
2
3
4
5
6
7
8
9
10
11
12
13
14
15
16
17
18
19
20
21
22
23
24
25
26
27
28
29
30
31
32
33
34
35
36
37
38
39
40
41
42
43
44
45
46
47
48
49
50
51
52
53
54
55
56
57
58
59
60
61
| public class JokerAdapter extends RecyclerView.Adapter<JokerAdapter.MyViewHolder> {
private List<Joker.DataBean> list;
private Context mContext;
private OnItemClickListener mOnItemClickListener;
public JokerAdapter(List<Joker.DataBean> list,Context context){
this.list=list;
this.mContext=context;
}
@Override
public MyViewHolder onCreateViewHolder(ViewGroup parent, int viewType) {
View view= LayoutInflater.from(parent.getContext()).inflate(R.layout.joker_rec_item,parent,false);
MyViewHolder viewHolder=new MyViewHolder(view);
return viewHolder;
}
@Override
public void onBindViewHolder(MyViewHolder holder, final int position) {
holder.txt_title.setText(list.get(position).getName());
holder.txt_content.setText(list.get(position).getText());
Glide.with(mContext).load(list.get(position).getBimageuri()).into(holder.img);
if(mOnItemClickListener!=null){
holder.itemView.setOnClickListener(new View.OnClickListener() {
@Override
public void onClick(View view) {
mOnItemClickListener.onClick(position);
}
});
}
}
@Override
public int getItemCount() {
return list.size();
}
//本来这个内部类是没有设置成静态的,但是听说不是静态的会造成内存泄漏?还望大神给我这个小白解答一下,感激不尽!
static class MyViewHolder extends RecyclerView.ViewHolder{
TextView txt_title;
TextView txt_content;
ImageView img;
public MyViewHolder(View itemView) {
super(itemView);
txt_title=itemView.findViewById(R.id.title);
txt_content=itemView.findViewById(R.id.content);
img=itemView.findViewById(R.id.img);
}
}
//点击事件接口
public interface OnItemClickListener{
void onClick( int position);
}
//设置点击事件
public void setOnItemClickListener(OnItemClickListener onItemClickListener ){
this.mOnItemClickListener=onItemClickListener;
}
}
|
以上就是我的适配器的所有代码,其中有个问题想请教诸位大神,还请大神不吝赐教:ViewHolder那个内部类是没有设置成静态的,但是听说不是静态的会造成内存泄漏?还望大神给我这个小白解答一下,感激不尽!
接着就是MainActivity:
1
2
3
4
5
6
7
8
9
10
11
12
13
14
15
16
17
18
19
20
21
22
23
24
25
26
27
28
29
30
31
32
33
34
35
36
37
38
39
40
41
42
43
44
45
46
47
48
49
50
51
52
53
54
55
56
57
| public class MainActivity extends AppCompatActivity implements JokerContract.View{
public static final String TAG="MainActivity";
JokerPresenter mPresenter;
JokerAdapter mAdapter;
List<Joker.DataBean> mList;
private RecyclerView mRecyclerView;
private ProgressBar mProgressBar;
@Override
protected void onCreate(Bundle savedInstanceState) {
super.onCreate(savedInstanceState);
setContentView(R.layout.activity_main);
mPresenter=new JokerPresenter(this);
mRecyclerView=findViewById(R.id.rec);
mProgressBar=findViewById(R.id.pro);
initData();
mPresenter.getJokerList("29","1"); //我们只获取了第一页的数据
}
private void initData(){
mList=new ArrayList<>();
mAdapter=new JokerAdapter(mList,this);
mAdapter.setOnItemClickListener(new JokerAdapter.OnItemClickListener() { //设置点击事件
@Override
public void onClick(int position) {
String url=mList.get(position).getVideouri(); //获取对应的视频链接,并且通过intent携带链接进行跳转
Intent intent=new Intent(MainActivity.this,VideoPlayActivity.class);
intent.putExtra("url",url);
startActivity(intent);
}
});
LinearLayoutManager manager=new LinearLayoutManager(MainActivity.this);
mRecyclerView.setLayoutManager(manager);
mRecyclerView.setAdapter(mAdapter);
}
@Override
public void showJokerList(List<Joker.DataBean> list) {
mProgressBar.setVisibility(View.VISIBLE);
mList.addAll(list);
mAdapter.notifyDataSetChanged();
}
@Override
public void getJokerListFinish() {
mProgressBar.setVisibility(View.GONE);
}
@Override
public void getJokerListErro(String msg) {
Toast.makeText(this, msg, Toast.LENGTH_SHORT).show();
Log.e(TAG,msg);
}
}
|
至此,V层算是完成了。
第七,就是完成VideoActivity啦,我直接用的VideoView来播放网络视频,先把VideoActivity布局文件写好,activity_video_play.xml:
1
2
3
4
5
6
7
8
9
10
11
12
13
| <android.support.constraint.ConstraintLayout xmlns:android="http://schemas.android.com/apk/res/android"
xmlns:app="http://schemas.android.com/apk/res-auto"
xmlns:tools="http://schemas.android.com/tools"
android:layout_width="match_parent"
android:layout_height="match_parent"
tools:context="top.cyixlq.rxtestapp.VideoPlayActivity">
<VideoView
android:id="@+id/video"
android:layout_width="match_parent"
android:layout_height="wrap_content" />
</android.support.constraint.ConstraintLayout>
|
我就是直接放的一个VideoView。然后编写activity代码,让VideoView播放网络视频:
1
2
3
4
5
6
7
8
9
10
11
12
13
14
15
16
17
18
19
20
21
22
23
24
25
26
27
28
| public class VideoPlayActivity extends AppCompatActivity {
private VideoView mVideoVIew;
@Override
protected void onCreate(Bundle savedInstanceState) {
super.onCreate(savedInstanceState);
setContentView(R.layout.activity_video_play);
mVideoVIew=findViewById(R.id.video);
mVideoVIew.setMediaController(new MediaController(this));
mVideoVIew.setOnCompletionListener(new MediaPlayer.OnCompletionListener() {
@Override
public void onCompletion(MediaPlayer mp) {
Toast.makeText(VideoPlayActivity.this, "播放完成了", Toast.LENGTH_SHORT).show();
}
});
startPlay();
}
private void startPlay(){
Intent intent=getIntent();
String url=intent.getStringExtra("url");
if(null!=url) {
mVideoVIew.setVideoURI(Uri.parse(url));
mVideoVIew.start();
}
}
}
|
这样就能轻松实现VideoView播放网络视频啦。然后我们整个Demo也就这样写完了哦!
后记
这只是一个简单的Demo,个人也是刚开始接触不久,如果还有什么地方写的不对,还望各位大神指教,本人不胜感激,求大神带飞!本Demo的GitHub地址:https://github.com/cyixlq/RxTestApp
本人只是一个在IT技术上不断探索的小白,希望能跟着大家一起进步,好的,今天就写到这里,白了个白!