欢迎来我的个人博客查看更多文章: Cy的个人博客
不久之前写过一篇基础的自定义View的博文,今天就来实践一下自定义View,参考了网上一个自定义View控件的博文完成的(毕竟还是小白)。以下是我完成的一些步骤:
首先肯定需要编写一个类,让它继承自View(感觉我这个简单的自定义view继承RelativeLayout就够了),然后重写构造方法咯,这个简单,代码如下:
1
2
3
4
5
6
7
8
9
10
11
public class QuanView extends RelativeLayout{
public QuanView(Context context) {
super(context);
}
public QuanView(Context context, AttributeSet attrs) {
super(context, attrs);
}
}然后就是初始化画笔,然后设定一些属性咯,所以现在的代码如下:
1
2
3
4
5
6
7
8
9
10
11
12
13
14
15
16
17
18
19
20
21
22
23
24
25
public class QuanView extends RelativeLayout{
private Paint mPaint;
private float mGap=20; //圆和圆之间的间距
private float mRadius=15; //圆的半径
private float mRemain; //画完圆和圆间距后多出来的距离
private int mCircleNum; //圆圈的数量
public QuanView(Context context) {
super(context);
initPaint();
}
public QuanView(Context context, AttributeSet attrs) {
super(context, attrs);
initPaint();
}
private void initPaint(){
mPaint=new Paint(Paint.ANTI_ALIAS_FLAG);
mPaint.setColor(Color.WHITE);
}
}在上一篇自定义博文中我们知道onSizeChanged方法会在onDraw方法前执行,我们可以在这个方法中计算好需要绘制的圆圈的个数,所以onSizeChanged方法中代码如下:
1
2
3
4
5
6
7
8
9
@Override
protected void onSizeChanged(int w, int h, int oldw, int oldh) {
super.onSizeChanged(w, h, oldw, oldh);
if (mRemain == 0) {
//计算不整除的剩余部分
mRemain = (int) (w - mGap) % (2 * mRadius + mGap);
}
mCircleNum = (int) ((w - mGap) / (2 * mRadius + mGap));
}接下来就是最重要的部分了,重写onDraw方法,绘制自定义View,onDraw代码如下:
1
2
3
4
5
6
7
8
9
10
11
12
@Override
protected void onDraw(Canvas canvas) {
super.onDraw(canvas);
for (int i = 0; i < mCircleNum; i++) {
//计算出要画的圆圈的x轴位置
float x = mGap + mRadius + mRemain / 2 + ((mGap + mRadius * 2) * i);
//从x位置开始画上面的圆圈
canvas.drawCircle(x, 0, mRadius, mPaint);
//从x位置开始画下面的圆圈
canvas.drawCircle(x, getHeight(), mRadius, mPaint);
}
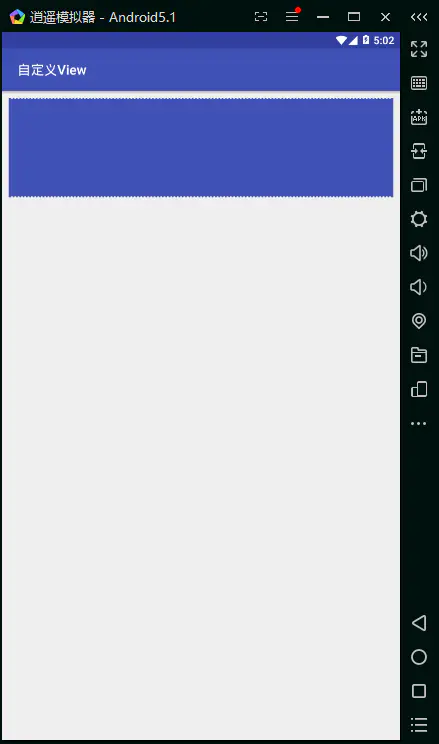
}至此,自定义的优惠券View已经可以使用了,让我们把它加入到布局文件中,代码如下 :
1
2
3
4
5
<top.cyixlq.view.widght.QuanView
android:layout_width="match_parent"
android:layout_height="150dp"
android:background="@color/colorPrimary">
</top.cyixlq.view.widght.QuanView>运行后的结果如图所示:
添加自定义属性,我们虽然能正常使用了,但是各个用户间需求不同我们还要能够自定义啊,这样才能用的舒心啊!首先就要在values目录下新建一个文件了,attrs.xml,然后在文件中加入以下代码:
1
2
3
4
5
6
7
8
9
<?xml version="1.0" encoding="utf-8" ?>
<resources>
<declare-styleable name="QuanView">
<!--圆半径大小-->
<attr name="radius" format="dimension" />
<!--圆与圆之间的间隔-->
<attr name="gap" format="dimension" />
</declare-styleable>
</resources>修改View的构造函数,读取布局文件中传来的参数:
1
2
3
4
5
6
7
8
public QuanView(Context context, AttributeSet attrs) {
super(context, attrs);
initPaint();
TypedArray typedArray=context.obtainStyledAttributes(attrs, R.styleable.QuanView);
mGap = typedArray.getDimensionPixelOffset(R.styleable.QuanView_gap,20);//最后那个参数代表默认值,如果布局文件中没有传入该参数则使用默认值
mRadius = typedArray.getDimensionPixelOffset(R.styleable.QuanView_radius,15);
typedArray.recycle();
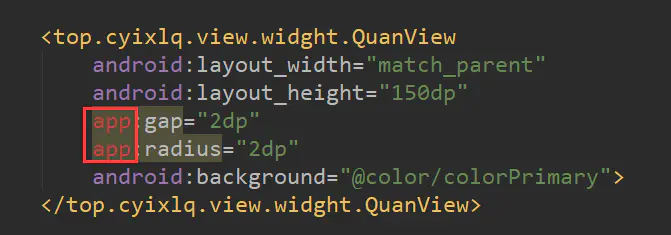
}在布局文件中加上我们的自定义的参数,代码如下:
1
2
3
4
5
6
7
<top.cyixlq.view.widght.QuanView
android:layout_width="match_parent"
android:layout_height="150dp"
app:gap="2dp"
app:radius="2dp"
android:background="@color/colorPrimary">
</top.cyixlq.view.widght.QuanView>(别忘了,使用了自定义的参数的话要引入一个命名空间哦,如下所示)
1
xmlns:app="http://schemas.android.com/apk/res-auto"
如果觉得这样不够帅的话,app这个字段是可以换的,例如:
1
xmlns:cy="http://schemas.android.com/apk/res-auto"
这时候在布局文件中的自定义组件的那一段代码报错了
这时候仅仅需要将布局中自定义的代码换成如下所示就可以了。(将app换成引入时候的名称cy)1
2
3
4
5
6
7<top.cyixlq.view.widght.QuanView
android:layout_width="match_parent"
android:layout_height="150dp"
cy:gap="2dp"
cy:radius="2dp"
android:background="@color/colorPrimary">
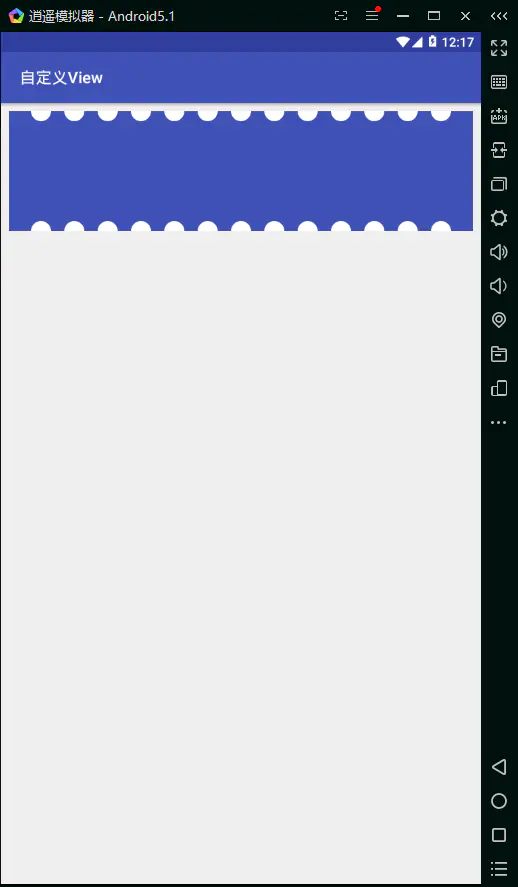
</top.cyixlq.view.widght.QuanView>这样是不是就具有标志性了呢?是不是更帅一点了呢?
最后我们再来看看修改后的效果吧!